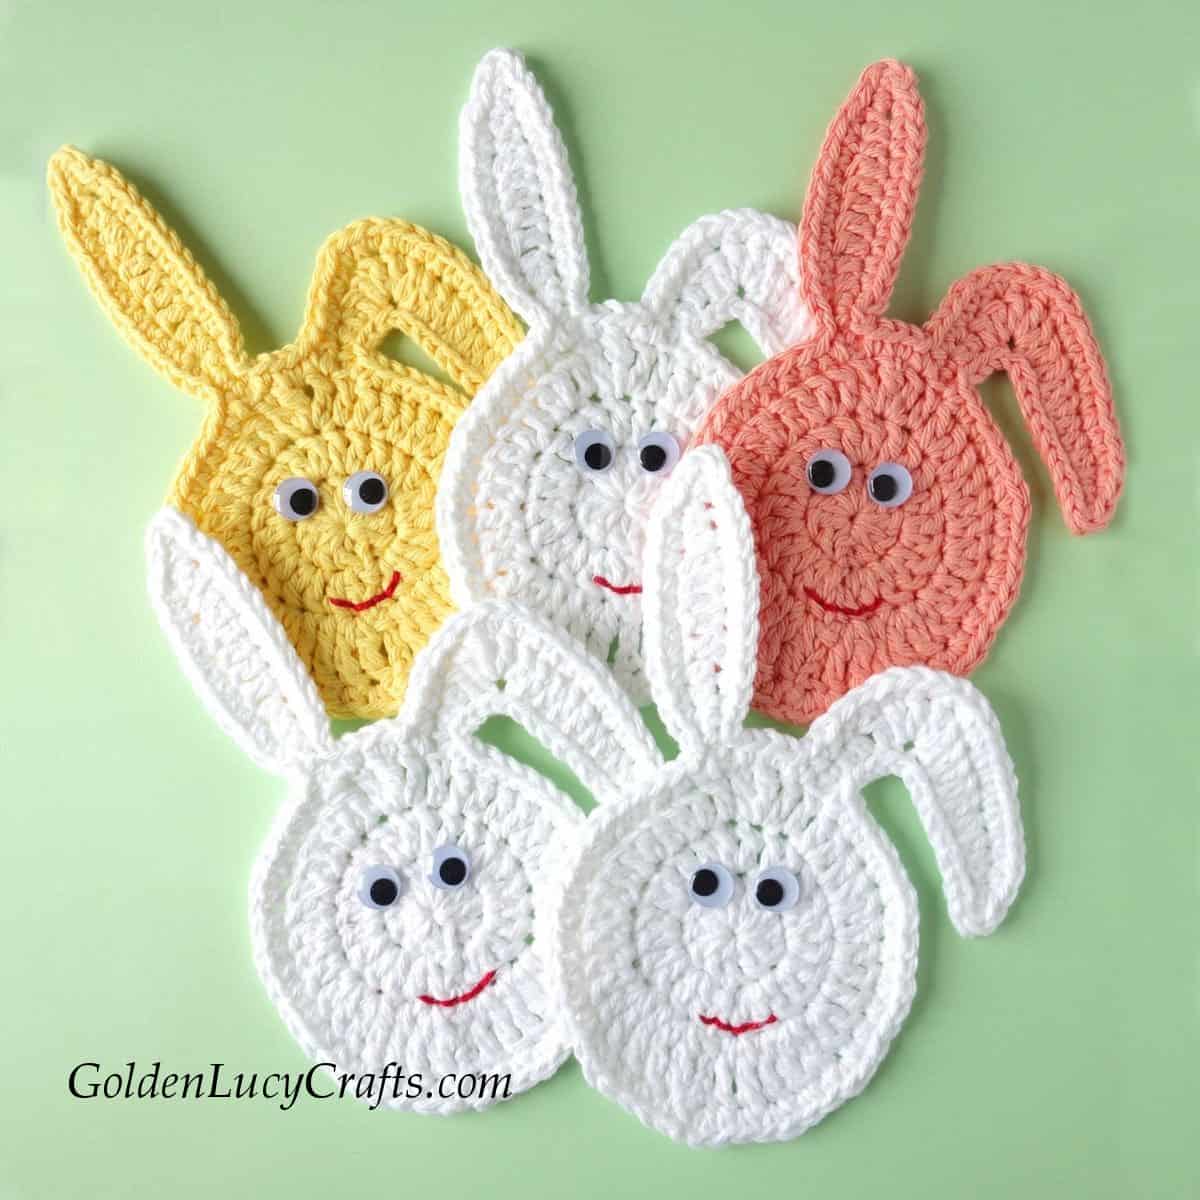
These crochet Easter Bunny Eggs are perfect for your Easter decoration! I designed them to make an Easter garland for our home and you will be able to find my Bunny Eggs Easter garland in my next post.
Besides garland, you can use these Easter Bunny Eggs for any other embellishment – for table decor, hang them on your door or window or just use them as appliques.
Disclosure: This post contains affiliate links, which means if you make a purchase from one of these links I will get a commission. As an Amazon Associate I earn from qualifying purchases.
You may also like these Easter crochet patterns: an Easter egg ornament, Easter bunny bunting, Easter egg faces, Easter snow globe, and heart-shaped Easter bunny applique.
More crochet patterns for Easter can be found in the posts Easter crochet pattern collection, Easter egg patterns on Etsy, and under the tag Easter.
If you are looking for more Easter crochet patterns and ideas, check out these patterns on the Etsy website!
Easter Bunny Egg Crochet Pattern
The pattern for this Bunny is also available as a print-friendly, styled, and advertisement-free PDF. You can get it from my Etsy Shop. Free pattern is below.
You can add this pattern to your Ravelry library HERE.
You can Pin this pattern to your Pinterest boards HERE or PIN the image below.

Abbreviations:
(See a list of crochet abbreviations used in patterns by yarn industry designers and publishers HERE)
Ch – chain
DC – double crochet
EDC – extended double crochet
HDC – half double crochet
Rnd – round
SC- single crochet
Sl St – slip stitch
St (Sts) – stitch (stitches)
TR – treble crochet
Finished Size:
This crochet Easter Bunny Egg is about 7″ (18 cm) tall.

Yarn:
Hook and other materials:
- Crochet hook US size 7/4.5 mm
- Googly Eyes
- Red embroidery floss
- Embroidery needle
Find my favorite craft and crochet supplies HERE!

Note:
How to make an Extended Double Crochet (EDC)
The extended double crochet stitch is a taller variation of standard double crochet.
- Yarn over. Insert the hook into the next stitch, yarn over, and draw the yarn through the stitch. There are now 3 loops on the hook.
- Yarn over and draw the yarn through the first loop on the hook. There are now 3 loops on the hook.
- Yarn over and draw the yarn through 2 loops on the hook. There are now 2 loops on the hook.
- Yarn over and draw the yarn through the 2 remaining loops on the hook.
The video tutorial for the extended double crochet stitch is available HERE.
Instructions:
Copyright: This pattern is an original design by GoldenLucyCrafts. You may not copy, rewrite, redistribute or resell this pattern in any form, this includes making video tutorials. You may not translate this pattern to another language and publish the pattern or any parts of it.
Make an adjustable ring,
Round 1. Ch 3 (counts as DC), 11 DC into the ring, draw the loop closed. To make it easier to do, first, untwist the tail, then pull the tail to draw the loop tightly closed. Sl St to 3rd Ch of beginning Ch-3 to join. Total – 12 DC.
Round 2. Ch 3 (counts as DC), DC in same place, 2 DC in each St around, Sl St to 3rd Ch of beginning Ch-3 to join. Total – 24 DC.
Round 3. Ch 4 (counts as TR), 2 TR in next St, TR in next St, TR+EDC in next St, *2 DC in next St, DC in next St* – repeat 4 times;
First Ear: Ch 16, SC in 2nd Ch and in next 2, HCD in next 3 Chs, DC in next 4 Chs, 4 DC in next Ch, DC in next Ch, HDC in next 2 Chs, SC in last Ch, Sl St in top of last DC of the Round;
EDC+TR+EDC in next St (top of the Bunny’s head);
Second Ear: Ch 16, SC in 2nd Ch and in next 2, HDC in next 2 Chs, DC in next 5 Chs, HDC in next 3 Chs, SC in next 2, Sl St in top of last EDC of the Round;
*DC in next St, 2 DC in next St* – repeat 4 times, EDC+TR in next St, TR in next St, 2 TR in next St, Sl St to 4th Ch of beginning Ch-4 to join.
Round 4. Ch 1, 2 SC in same St, *SC in next 2 Sts, 2 SC in next St* – repeat 4 times, SC in each of next 5 Sts;
working along the first side of the ear – Sl St in next 4 Sts, skip next St, Sl St in next 10 Sts, continue working along the second side of the ear – Sl St in next 2 Sts, SC in next 9 Sts, 2 SC in next 3 Sts, SC in next 4 Sts;
SC in same St where the ear is joined to the head, 2 SC in next St, SC in next St;
continue working along the first side of the second ear – Sl St in next 2 Sts, SC in next 11 Sts, Sl St in next 2 sts, continue working along the second side of the ear – Sl St in next 3 Sts, SC in next 10 Sts, Sl St in next 2 Sts;
SC in same St where the ear is joined to the head, SC in next 4 Sts, *2 SC into next St, SC into each of next 2 Sts* – repeat to the end of the round, Sl St to 1st SC to join. Fasten off.

Finishing:
1. Block your Easter Bunny Eggs as necessary.
2. Embroider the mouth, attach googly eyes. (For babies and small children items – embroider the eyes on).
You can also embellish your Bunny Egg with a small crochet bow. For this bow, I used a small amount of cotton light weight #3 yarn.

I hope you enjoyed this Easter Bunny Egg free crochet pattern!
Happy Crocheting!


For more crochet patterns, craft ideas, and fun projects, follow GoldenLucyCrafts on Facebook, Pinterest, and Instagram!
You may also like:
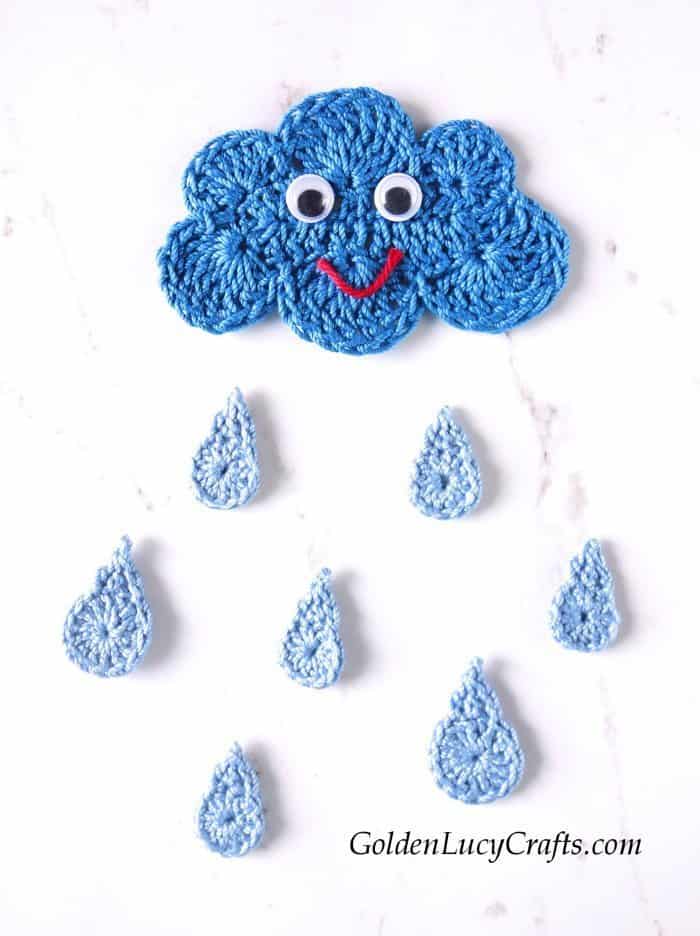
Crochet Clouds and Raindrops Applique
These are adorable! Thank you! I love your work!
Thank you so much! I am very happy to hear that!
Just exactly what I wanted. Thank you
i just ordered the pattern for easter bunny egg i am left handed is the directions the same as right handers?
I’m sorry, but I am right-handed, and my patterns are written for right-handers. To adapt for left-handers, you will need to convert the instructions.