
This crochet Dog Bandana is easy to make and could be finished in one evening. Use some bright and beautiful color for this bandana and your dog will look cute, stylish and will attract the attention of everybody when you take your pet for a walk!
Disclosure: This post contains affiliate links, which means if you make a purchase from one of these links I will get a commission. As an Amazon Associate I earn from qualifying purchases.
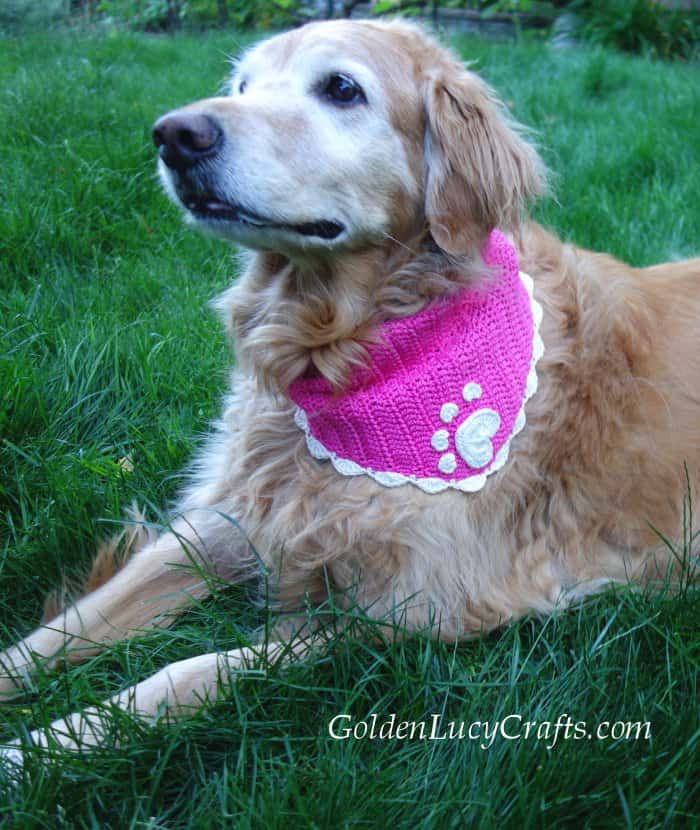
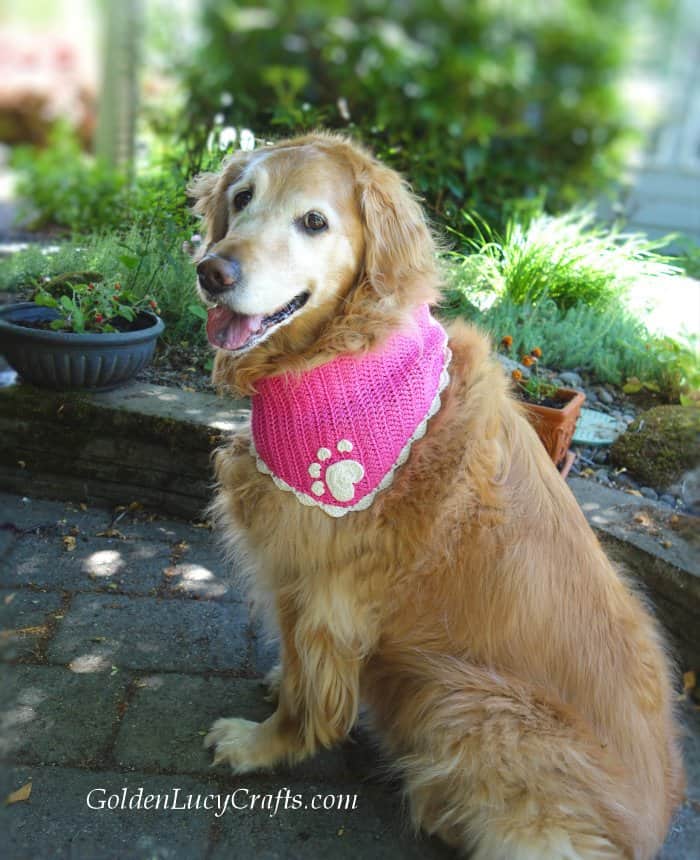
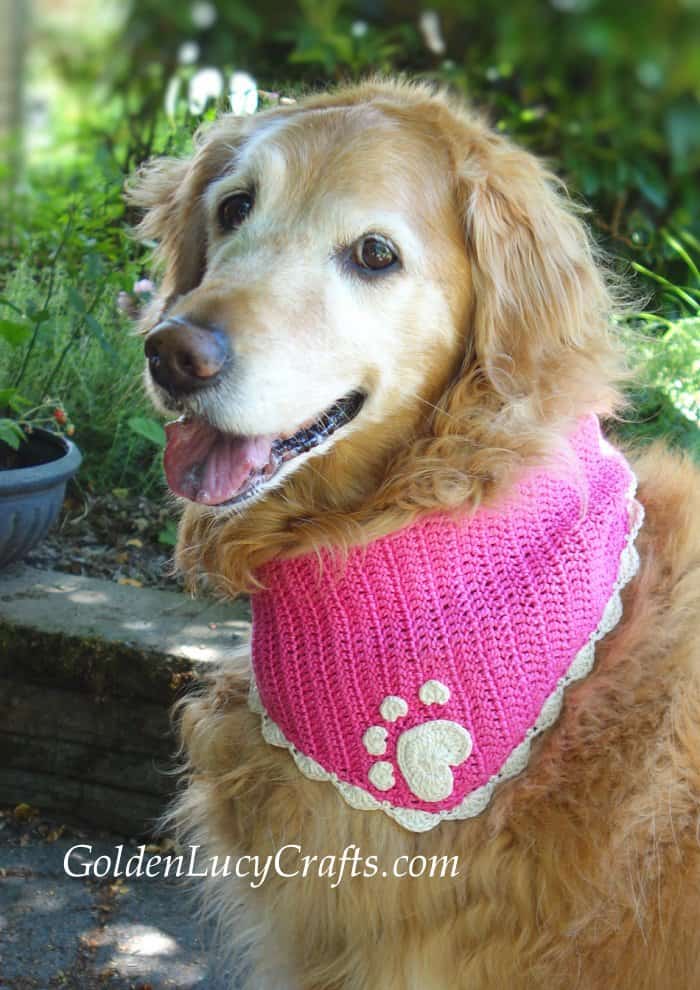
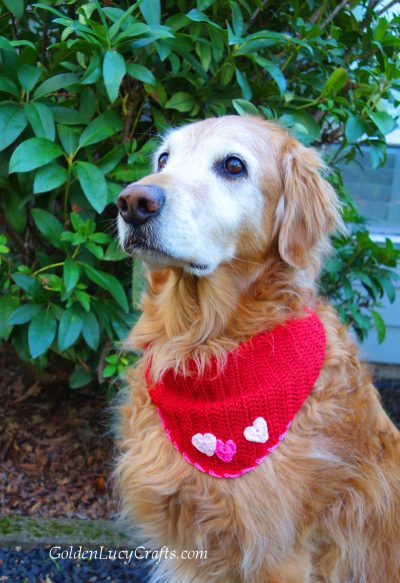
I made this crochet Bandana for our dog Lucy, our super cute Golden Retriever. She looks very fashionable, beautiful and proud when she is wearing her bandana!
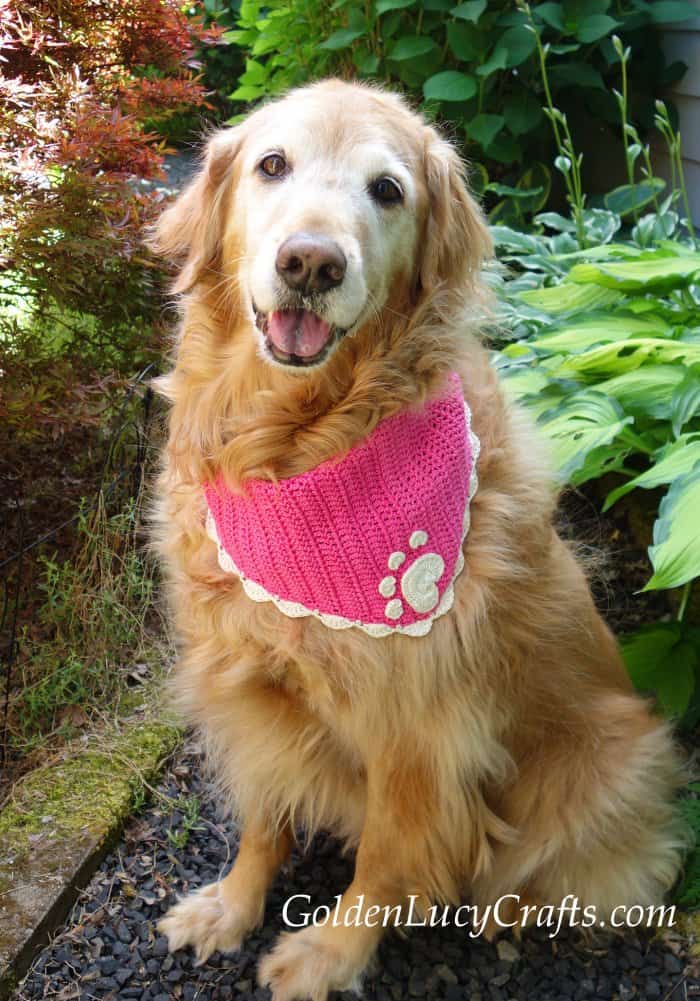
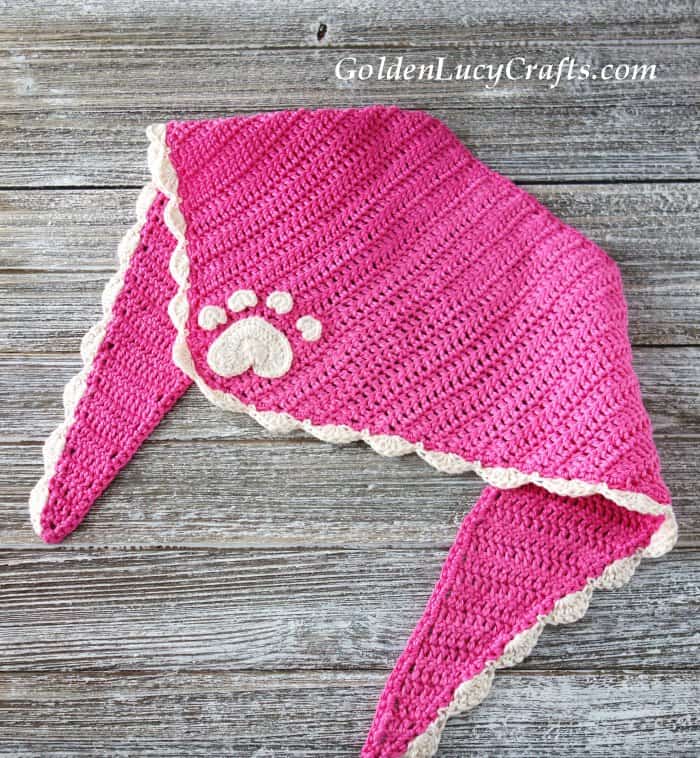
This crochet dog bandana is made from cotton yarn and embellished with a crochet heart paw print applique.
The paw print applique is made from one large heart for the pad and four small hearts for the toes. You can use such paw print applique to embellish any of your dog items.
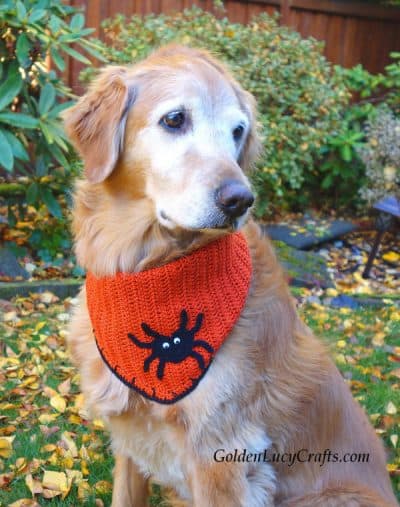
If you like to crochet for your dog and dress him up for holidays, you can use this crochet dog bandana pattern to make bandana in specific seasonal colors and embellish with seasonal appliques.
For example, crochet Bat applique or Spider applique for Halloween, crochet Reindeer applique for Christmas, crochet Shamrock applique for St. Patrick’s Day.
Here is Lucy’s Halloween bandana:
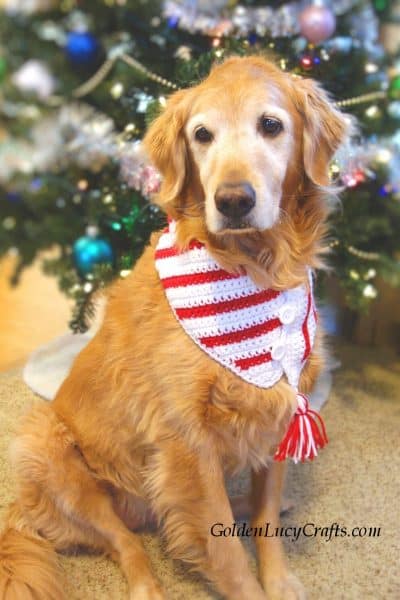
You may also like this crochet Christmas scarf I made for Lucy:
If you are looking for more crochet patterns for pets, check out these patterns on the Etsy website!
Also, check out these gift ideas for pets and pet lovers!
Bandana for Dog Crochet Pattern
The pattern for this crochet dog bandana is also available as a print-friendly, styled, and advertisement-free PDF. You can get it from my ETSY shop. Free pattern is below.
You can add this crochet dog bandana pattern to your Ravelry library HERE.
You can PIN this pattern to your Pinterest boards HERE or PIN the image below.

Abbreviations:
(See a list of crochet abbreviations used in patterns by yarn industry designers and publishers HERE)
Ch – chain
DC – double crochet
Rnd – round
SC- single crochet
Sl St – slip stitch
St (Sts) – stitch (stitches)
Finished Size:
Approximately 33” long and 9” wide. This bandana will fit medium-large size dogs (as shown on a 62 pound golden retriever).
To make the bandana smaller or larger, follow the pattern (you will need to repeat rows 4-5 fewer or more times) until you reach half of the desired length across the straight side, and then start to decrease.
Make sure that you decrease on the same side where you did increases, not on the straight side!
Follow the same principle if you want to use a different yarn weight.
Yarn:
Patons Grace light weight #3 yarn (100% mercerized cotton, color – lotus), 1.75 oz/50 g – 2 skeins, Color A
Patons Grace light weight #3 yarn (100% mercerized cotton, color – natural), 1.75 oz/50 g – 1 skein, Color B

Hook:
Find my favorite craft and crochet supplies HERE!
Instructions:
Copyright: This pattern is an original design by GoldenLucyCrafts. You may not copy, rewrite, redistribute or resell this pattern in any form, this includes making video tutorials. You may not translate this pattern to another language and publish the pattern or any parts of it.
Bandana
Note: Ch 3 at the beginning counts as a stitch.
With Color A, Ch 4 (Ch 1 and Ch 3 as first DC);
Row 1. DC in 4th Ch from hook – 2 DC. Turn.
Row 2. Ch 3, 2 DC in next St – 3 DC. Turn.
Row 3. Ch 3, DC in first St and in each St to end of row – 4 DC. Turn.
Row 4. Ch 3, DC in next St and in each St to last St, 2 DC in last St – 5 DC. Turn.
Row 5. Ch 3, DC in first St and in each St to end of row – 6 DC. Turn.
Rows 6 – 43. Repeat Rows 4 – 5 nineteen times – 44 DC. Turn.
Begin decreases.
Row 44. Ch 3, DC in next St and in each St to last 2 Sts, DC2tog – 43 DC. Turn.
Row 45. Ch 2 (counts as partial DC and doesn’t count as a stitch), DC in next St, DC in each St to end of row – 42 DC. Turn.
Rows 46 – 85. Repeat Rows 44 – 45 until you have 2 DC remaining.
Row 86. Ch 2, DC in next St.
Do not fasten off.
Border
Note: when working along the row ends, work into the spaces between the row-end st and next stitch.
Rnd 1. Ch 1, work 2 SC in each row-end DC around. Fasten off color A.
Row 2. Shell Edging
Note: we will NOT be making shells along the longest straight side, only along short sides.
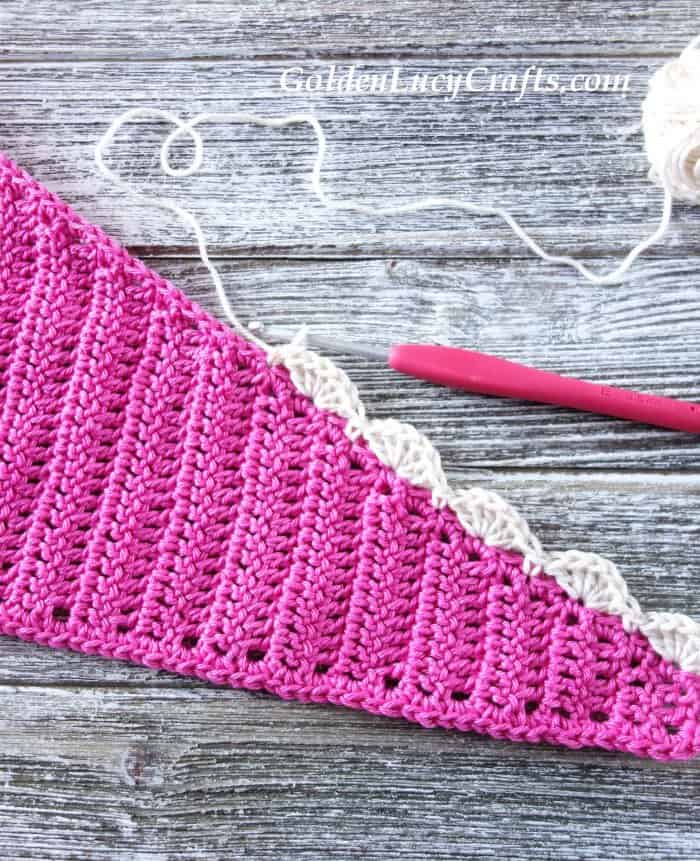
With bandana laying in front of you and longest straight side on the bottom, join Color B to the corner on the right, Ch 1, SC in next St, *skip 2 Sts, 6 DC in next St, skip 2 Sts, SC in next.
Repeat from *across both short sides, Sl St in last.
Fasten off.

Make crochet Paw Print applique and sew it on the bandana.
I hope you enjoyed this free crochet pattern for a dog bandana!
Happy Crocheting!

For more crochet patterns, craft ideas, and fun projects, follow GoldenLucyCrafts on Facebook, Pinterest, and Instagram!
You may also like:
Valentine’s Day Crochet Dog Bandana
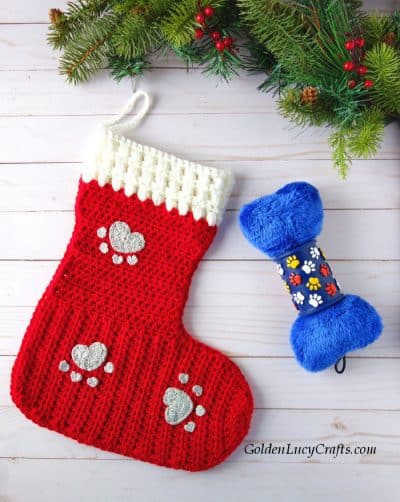
Crochet Christmas Stocking for your pet
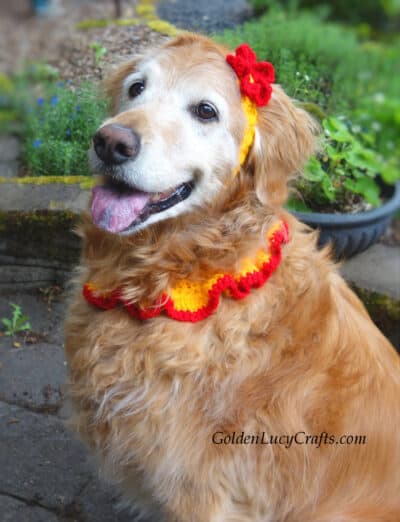
Crochet Dog Collar and Headband
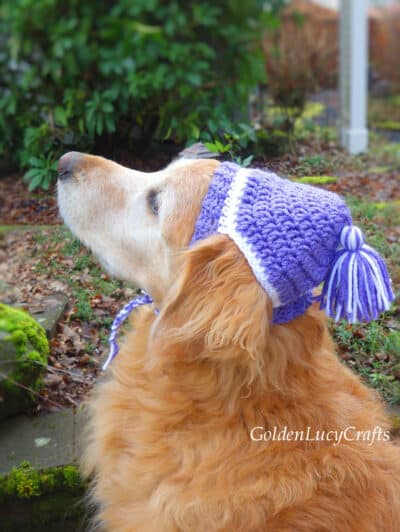
Crochet Dog Hat
Hello, this is a beautiful bandana pattern! I wanted to make it for a dog that is about 13 pounds). What would be your suggestion to making this a little smaller? My initial thoughts were to not do a full repeat of rows 4-5 19 times, and start the decreases earlier.
My apologies, I’m still a little new at crocheting.
Hi Sarah,
Thank you so much for your kind words! I am happy that you like this bandana!
Yes, you are correct. You will need to repeat Rows 4-5 fewer times. Approximate bandana size for smaller dogs up to 15-20 pounds is about 20” long across. So, follow the pattern until you reach about 10” across the straight side, then start to decrease.
Thank you so much! I can’t wait to try out this pattern 🙂
LOVE LOVE the looks of this bandana, and your adorable model!!
I am a newbie crocheted, and am having a hard time with first and next stitch as referenced in rows 4 and 5.
DC in first stitch – it means you work DC in the very first stitch just next to Ch 3, or it is the last stitch from the previous row.
DC in next stitch – it means you skip the first stitch and work in the stitch after the first. Hope this will help.
Love the dog bandana. Just asking how would I make it for a smaller dog? Thank you, Shirie White
Hi Shirie, I am very glad that you like this bandana! Approximate bandana size for smaller dogs up to 15-20 pounds is about 20” long, for dogs up to 35 – 45 pounds is about 27” long. So, follow the pattern until you reach half of the length across the straight side, then start to decrease.
Super cute pattern! Curious for the yarn. I have tons of regular ol’ acrylic WW yarn. Would that be okay to use or is there a reason to stick with cotton? I’d love to make this for my friends’ puppers.
Yes, you can use acrylic. It’s just my preference – I like to work with cotton.
How do you attach the bandana? Tie it, attach ends with Velcro?
I just tied the ends of the bandana.
Hi there! First of all let me say that I LOVE this bandana. It’s the cutest one I’ve ever seen. And the paw print is awesome! I have tons of #4 worsted weight yarn that I’d like to use but I’m not sure how to adjust the pattern so it is still the same size as yours. Can you tell me how I could do that? And what size hook should I use? I’m so excited to make these. My friend has a Basset Hound Rescue and every year they have a fundraiser and I’d like to make a bunch of these as I think folks would love them! Thank you for such a great pattern!
I am very happy to hear that you like my bandana! Thank you so much for your compliments!
To make this bandana with #4 weight yarn, use crochet hook 5 mm and work Rows 1-27. Start decreasing on Row 28. It will be about the same size 33″ long and 9″ wide. If you need to make smaller bandana, repeat Rows 4-5 fewer times.
It is wonderful that you are planning to make this bandana for a fundraiser! Thank you so much for choosing my pattern!
By the way, in the next couple of days, I will publish another cute pattern for dogs. I hope you will like it too!
On the directions for the border, where it says Rnd. 1, did you mean “row 1”? I’m new to crochet and not sure if that is an actual stitch or was that a typo?
Thanks,
Sherrie
Hi Sherrie, Rnd is an abbreviation for a Round. Crocheting in rows is when you crochet back and forth across turning after each row, crocheting in rounds is when you crochet around without turning. The first row of the border we are working around all three sides, that is why I called it round. Thank you for asking!
I have attempted to follow your instructions but I’m not getting the V shape of a bandana. For rows 6 – 43 i have tried alternating rows 4 & 5 making 19 rows of each and I’ve tried making 19 rows of 4 and then 19 rows of 5 and all i am getting is a thin strip. What am i doing wrong?
This pattern works from the corner, so you will have one straight side an all increases will be on another side. Every row until you reach the center, you will be adding one dc. One row (row 4) – at the end, next row (row 5) – at the beginning.
Hi,
I’m working the pattern and I have a question. For rows 44-85 do you go into the ch spaces at the end of the rows?
Pattern says that Ch 3 at the beginning counts as a stitch. So, you need to treat Ch 3 as DC and work in top of it, not into space.
Hello,
I’m loving this pattern but just want to clarify –
row 3 starts DC in first stitch, while row 4 starts DC in next St.
Am I correct that this basically means to skip the first stich on each alternate row?
thanks so much!!
Yes, it is correct. We are making increases in each row on one side only. Also, Ch 3 at the beginning counts as first DC. So, in Row 4 we start with Ch 3 – it counts as first DC, then we work DC in next St. At the end of the row we are making 2 DC – this is our increase at the end of this row. In the next row we start with Ch 3 – this is our first DC, then we make another DC in same first St. So, we made 2 DC (Ch 3 as DC + DC) and this is our increase at the beginning of this row.
Many thanks!!!!
Hi, thank you for making this pattern available! It’s so cute!! I made one for our Australian and it fit her great! Making her the Halloween version now!
But I need to make a second one of our other Dog, that needs to be much bigger ( he is a little over 100 pounds, really thick neck)
I was thinking of just repeating rows 4- t more then the 19 times, till I get the size needed but I’m worried I’ll lose the shape.
Thank you for your time
Hi Jennifer! Thank you so much for your kind words. I am glad to hear that you’ve already made my bandana and you liked it!
You are correct – to make this bandana larger, you need to repeat rows 4-5 until you reach half of the desired length of the bandana across the straight side, then start to decrease.
Hi,
I’m going to make this one, it looks great! But is there a YouTube video that I could use? It’s easier for me to mimic someone doing it rather than reading a pattern
I am sorry, I don’t have a video.
Hey there, I love this pattern and new to doggie wear, how does it fasten on the dog .
I just tied the ends of the bandana.
I’m glad I am not the only one getting confused on the decrease rows.
It would have been helpful if you laid the finished project out flat to see the shape.
This will end up as a plan B project….”something else “. Too bad, because it would have been nice.
Please, send me an email at [email protected], I will be glad to help you. Also, I will add a picture with full size bandana to see the shape.
I would like to make this for a small dog, a cavapoo, which is a 5 pound puppy right now. How many rows do you suggest. I will be using worsted weight 3 yarn so what size hook would you suggest for that.
The approximate bandana size for smaller dogs up to 15-20 pounds is about 20” long. To make the bandana smaller, follow the pattern (you will need to repeat rows 4-5 fewer times) until you reach half of the desired length across the straight side, and then start to decrease. Make sure that you decrease on the same side where you did increases, not on the straight side! Follow the same principle if you want to use a different yarn weight. Hope this will help!
I have a question regarding ROW 5.
I don’t understand how Row 5 has 6 DC at the end.
Should it be an increase every other row and dc across without an increase every other row.
Row 4. Ch 3, DC in next St and in each St to last St, 2 DC in last St – 5 DC. Turn.
Row 5. Ch 3, DC in first St and in each St to end of row – 6 DC. Turn.
Rows 6 – 43. Repeat Rows 4 – 5 nineteen times – 44 DC. Turn.
It is not correct. Increases are on one side of every row, not every other row.